Billing
Group and Room billing
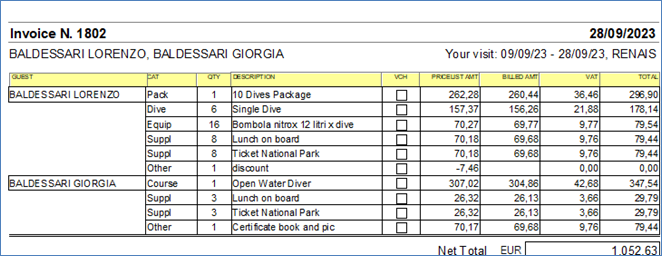
With this new functionality, it’s now
possible to issue a single bill that includes activities of multiple guests.
A typical example of such situation could be a family bill, or a bill
including the guests residing in the same room, or a bill issued to a group
of guests.
In order to declare that a guest will be
paid by another one, you can use one out of three ways:
1)
When you check-in the guests, first register the
payer, and then when you register the ones that will be paid by the
first one, select the payer in the [Bill paid by] drop-down in the [Prices
policy] section

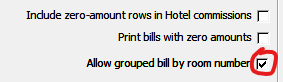
2)
If you want to issue bills by room number
(typical situation used in big resorts), enable the relevant option in the
Preferences/Pricelist-collecting page:
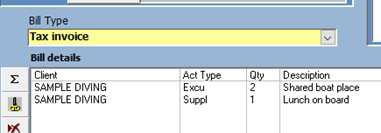
3) For issueing a single bill to a group of quick temporary clients
(i.e. a group of snorkelers that want to make a single payment), check the
[Enable advanced payment] and the [Single payment for group] options in the Add
quick guest form, and collect the due amount for the whole group.

For guests registered using the standard
Clients form (case n. 1 above), when you issue a bill to one of them (being him
the payer or just one of the paid ones), the system asks you who you want to
bill:
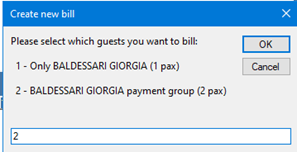
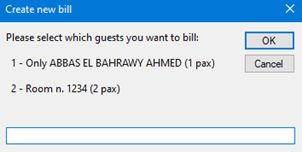
and the issued bill will contain the services of all clients.
Of course, the package calculation is done by guest, so if a diver makes
4 dives and his son makes 4 dives too, these will NOT be calculated as an 8
dives package.
Cross-selling items in the pricelist
Many times we have services in the
pricelist that ar always sold along with other services; a typycal example is a
pic/certification sold with a course.
Now you can specify, for any service in the
pricelist, possible services and/or shop items that are sold automatically each
time you sell the main service.
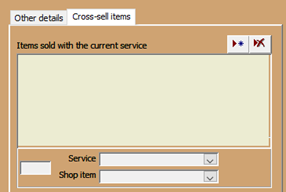
To add cross-selling items, click on the
[Add Detail] button on the top of the list, enter the quantity, select a
service or a shop item, and click on the [Save detail] button.
In the following image we can see a PIC/Manual added to an Open Water Course:

Once that cross-sell items have been defined in
the pricelist, when you sell a service that has cross-sell items (i.e. enroll a
client to a course), the cross-sell items are automatically added to the bill
of the client.
Boat trips
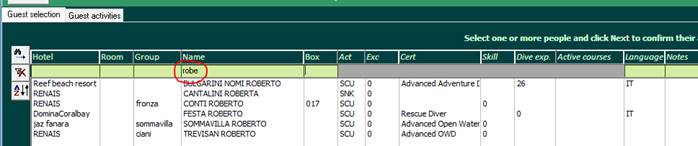
Quick search of guests to add to the trip
When you’re adding guests to a trip from
the guest registry, now you can quickly search the desired guests by multiple
fields.
Just enter the search values in the green boxes above the guest list, and it
will be filtered by those values.
To remove all the filters, click on the [Remove filter] button on the left of
the list.
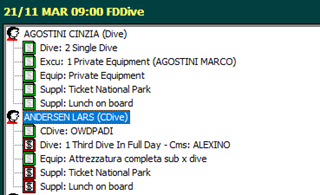
Direct editing in the guest list table view
Guests that are
participating to an excursion can be seen in one of two ways: treeview and
tableview. You can switch from one view to the other clicking on the
treeview/tableview buttons:

 .
.
For your convenience, you can set the
preferred view in the Preferences form, so that is preselected each time you
open the Trips form

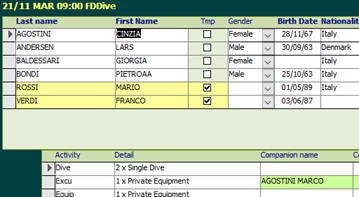
Each view has its own advantages; treeview
is more compact, but requires more clicks in order to edit a guest or an
activity, while tableview is less compact but allows you to edit data
directly in the table, as you usually do in an Excel document. This is
really convenient to quickly enter names, birth date, passports, nationality,
room number and assigned box for any guests, both temporary and registered.
When the table view is active, click on a row in the upper list (guests) in
order to view in the bottom list all the activities assigned to the selected
guest.
Selling boat places to external centers
If you have your own boats and sell places to
other diving centers, there is a new functionality that helps you managing this
activity. Here how to use it:
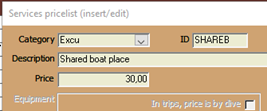
1. First of all, in the services pricelist, add an item of category Excursion,
that will be debited to the external center for each guest that participates to
your trip.
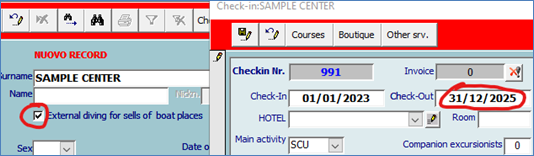
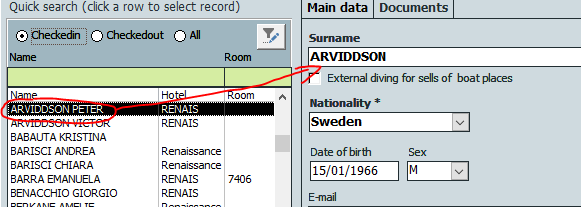
2. Register the external diving center in your clients registry, as if
it was a regular client, but remember to select the checkbox [External
diving for sells of boat places], and give it a far away check-out date.
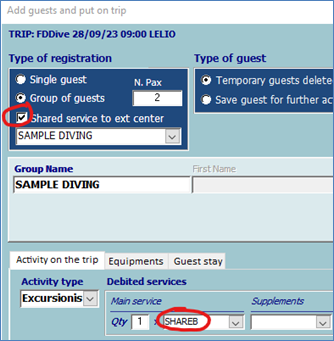
3.
When you add the guests to the trip using the [Quick
guests] button, select the [Shared service to ext center] checkbox and
choose the center that is sending you the guests.
Then, in the [Main service] drop-down select the service that will be debited
to the external diving center for each guest.
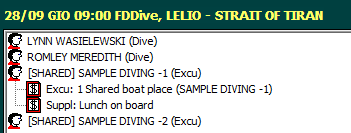
Now your boat list will contain all the external guest too.
If you want it, you can edit them as usual for entering their names and
passports, but this is not mandatory (as they are owned by the external
center).
You can even add extra services to these guests, if needed.
In order to bill the external center that
you sell boat places to, when you close the trip, the temporary shared
guests will be automatically deleted, and all their services assigned to the
external diving center to which they belong.
In this way, you can issue and collect a bill for the external diving center,
as you do for any standard client.
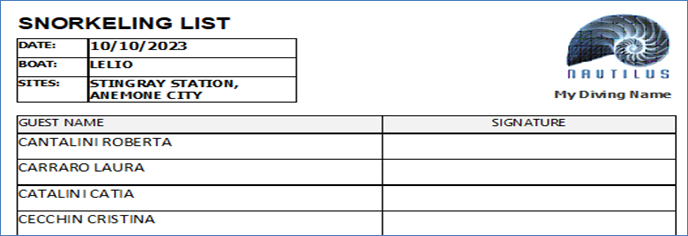
Snorkeling list
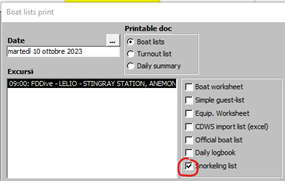 A new kind of document can be printed for a trip: the snorkeling
list. This is a simple list containing anly some general information about the
trip and the list of snorkelers, along with a box for signature of each guest.
A new kind of document can be printed for a trip: the snorkeling
list. This is a simple list containing anly some general information about the
trip and the list of snorkelers, along with a box for signature of each guest.
As for other printouts, the logo is the one in
the Preferences form.
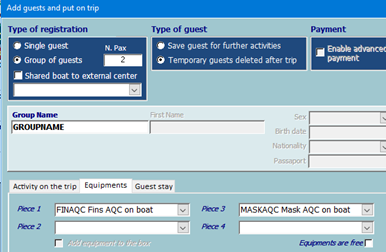
Quick “temporary” guests equipments
When adding a group, is possible to assign the
same equipments to all participants (i.e. mask and fins for snorkelers)
withouth choosing sizes for each guest. In this case, just the rent cost is
debited, avoiding the need to manage the storehouse details.
This option is very useful for activities like snorkeling, where you don’t want
to register in the system the exact size of each rented equipment, as
the guest – once has paid – can go directly to the equipments departments to
take what he needs for the trip.

Other changes
Saving of companion names
From now on, when you add for the first
time a guest on a trip that has one or more companions, the names and passport
numbers of the companions are saved in the database, so that you don’t have to
enter them again the next time that you add the same guest with companions to
the trip.
Actions on closed trips
Even when a trip has been closed, the
action buttons to enter advanced payment and to make a bill remains enabled,
allowing you to carry on those actions without leaving the page.
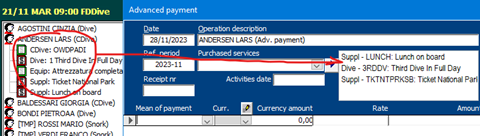
Advanced payments
When entering an advanced payment for a
guest from the trip form, if you select the name of the guest in the
treeview/tableview, then the details of all the the activities done by the
guests on the trip are already preselected in the advanced payment, eliminating
the need form manual entry.
Tank count on boatlist
On the Boat Worksheet and Equipment
Worksheet printouts, the tank count takes in to account also any extra dive
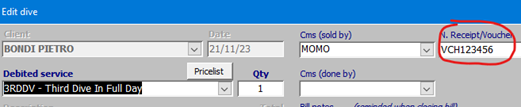
Receipt number for sell commissions
When assigning the staff subject that will
take a sell commission, it is possible to enter a receipt/voucher number
that identify the sell. This number will be
printed in the detailed commission statement
Clients management
New Clients page
The main page for managing your clients has
been completely renewed, in order to speed up and simplify all operations. The
main highlights of the new page are:
-
General data and checkin data in a single page
-
Quick search by name/room/box
-
Picture of guest, for better recognition, along
with other attached documents (certification, passport, etc.)
-
Input validation with error highlighting
The usage of the new page is
straightforward, anyway here some hints that can be useful.
On the left side of the page there is a search
list, that by default contains all the checked-in clients. Using the option
buttons above the list, you can show checked-in, checked-out or all clients. On
the top of this basic filter, you can use the filter butto to apply any kind of
filter to the list.
To select a client, click the
corresponding item in the search list on the left of the page:
For quickly searching a client, just
enter the name/surname (or part of it) in the Name search box or a room/box
number in the Room/Box search box, and press Enter: the list will show only the
guests that match the entered criteria (to clear the filter, just delete the
entered criteria):

Below the general data, on the right side
of the page, there is a box that clearly indicates the current state of the selected
client (checkedin/checkedout). Depending on the current state, a button for
checking out or checking in the client becomes available:

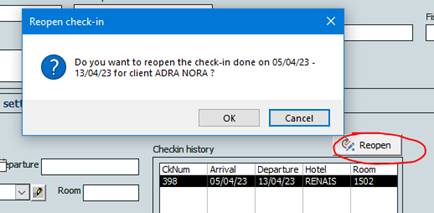
When you’re
viewing a checked-out client, in the “Checkin history” list you see all the
previous checkins.
If you want to reopen the last checkin, select it in the list and click on the
[Reopen checkin] button:
Search clients by Box number
In the majority of forms that allows to select
a client from a list by his name (add client to a trip, enroll to a course,
sell a shop item, prepare a bill, etc.), pressing Shift+[F3] when inside a client
dropdown list opens a secondary search dropdown, that allows you to select a
guest by Room number.
Now is possible to decide if this secondary search is made by Room or by
assigned equipment Box.
Just select your preferred way in the Preferences form:

Client import from Excel
Added columns for importing address, zip code,
city and phone
Client images
If a certification and/or personal document
image has been saved for a client, now you can double-click on the image to
view it in the system image viewer
Web Checkin – pdf documents
For those that use the web checkin plugin
offered by Nautilus, now all the signed papers (PADI forms) are downloaded and
saved inside Nautilus database, so they can be viewed/printed at anytime.
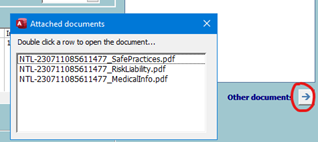
When a client has such documents, in the Documents
section of the Clients page you will see the list of attached documents; just
double-click an item in the list to open it.
Staff Management
Salary calculation
Now is possible to declare in Nautilus the
details of the paid salary to each staff, so that the due amounts are
automatically calculated along with commissions. This allows you to manage all
staff payments inside Nautilus, and the payment transaction automatically added
to the book keeping when you close the commission bill of the staff.
Let’s see how to proceed…
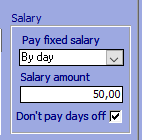
First of all we have to enter the details
of the salary assigned to each staff. In the Commission rates definition form,
enter the type of salary: By month, By week or By day, and the amount
that you pay for each Month/Week/Day.
If you want to take into account the days off (that means to don’t pay salary
in days off), then select the appropriate checkbox.
Despite the type of salary chosen, you can make
the calculation with the frequency that you like, for example once a month, or
once a week, or whatever period you like. Nautilus will use the defined amounts
and scale them on the chosen period.
Note: if you define the
salary by month, and then calculate for a period that does not start and end
with the beginning and end of a month, than Nautilus will divide the monthly
amount by 30 and then multiply it by the worked days.
Once that you’ve entered the salary rates for
your staff member, and before executing any calculation, remember to review the
member attendance if you selected the checkbox [Don’t pay days off].

Now, when you make a calculation, the
salary is added to the commissions (if any). If no commission are given to a
specific staff, then only the salary is taken into account.

Commissions
New rates definition form
The form used to set the parameters and to
define the rates used in the commissions calculation has been redesigned and
simplified.
In the left area we have the general parameters: groups of services/items and
other general settings that are applied to all the subjects when calculation is
done.
In the right area we have all the parameters that are defined for a single
subject (being it a staff member, and hotel or a tour operator).
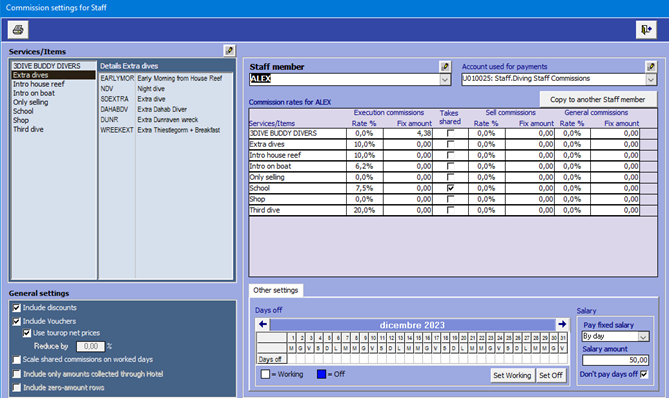
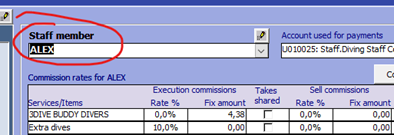
Now, when you want to set the rates, days
off, salary for a specific subject, first select him/her from the dropdown
list.
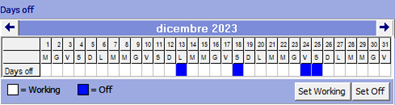
In the days off
section, now you have to set only the days off (and not all the worked days as
before)
Then there is a new box
where you can set parameters used to calculate salary and add it to the commission
statement (see next paragraph).
Other General Features
Auto-sync of web checkins
For those who use the web checkin
functionality (offered by Nautilus Online Services and/or integrated in their
own website), the downloading of new checkins is carried out automatically by a
Nautilus Agent application that runs in the background.
By default, the syncing of data is executed
every five minutes, and a log of the exchanged data can be viewed in
Diving/Preferences page, in the Web Services tab. The interval between syncs
can be set using the [Auto-sync interval] drop-down.
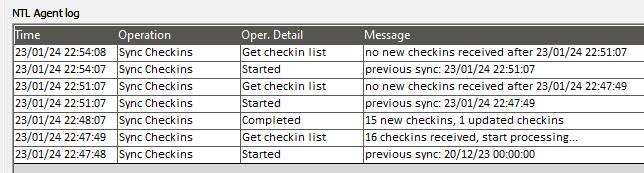
If any error occours during the sync process,
here you can see all the the details.
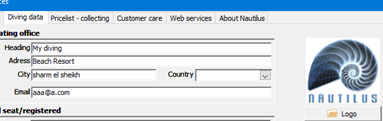
Logo customization
Now you can change the logo that is printed
on official documents in an easy way.
Open Diving/Preferences/Diving Data and use the [Logo] button below the preview
box to upload your image
Discount conditions
It has been reactivated the possibility to
create predefined discount conditions (so called “selective by client”) that
can be applied to a particular client during the checkin process and/or during
billing. These conditions are useful for quickly applying discounts like “10%
on all courses”, “5% on dives for locals”, etc.
Resolved Issues
·
Web checkin: the request for regulators is not
downloaded correctly
·
Billing: the print preview of the bill could generate
an error
·
Boat Trip: adding a variable price service to a
guest did not allow to enter the required price and description
·
Boat trips roster: when duplicating a trip on a
different week, an error was raised when trying to select the new trip
·
Daily Log roster: now also the guests doing a
course dive are added to the list
·
Billing: applying a selective by client discount
using the scissors generated a wrong amount
·
Security: it was not possible to change
permissions for a new user
·
Courses: it was not possible to register a new
course enrollment if the course edit form is opened without selecting in
advance the guest to enroll
·
Work Boatsheet: the activity details (i.e.
course detail) were not printed in the ACT column
·
Box management: sometimes there were errors in
adding/removing items to/from box
·
Equipment worksheet: sometimes guests names were
duplicated, when they had pieces inside and outside of the box
·
Checkin: when enrolling to a course from the
checkin form, sometimes the list of courses does not refresh, even though the
course is correctly saved
·
Shop: when selling a shop item, in certain
conditions the price cell does not show the price of the purchased service,
even though the sell is correct